Tuesday, March 31, 2009

Fun shoot at the gun club range

The girls' 4-H shooting sports club celebrated the end of their season with a friendly "fun shoot" at the range with an NRA youth team that they competed against during the Postal Leagues.


My girls were the youngest and least experienced shooters in attendance, which was clear when looking at the other shooters. The older, more experienced boys used shooting jackets, slings and wrist pads to help steady their gun.


 The shooting coaches, as well as Fino and I, have encouraged my girls to try the shooting jackets but both of them refuse. They claim the jackets are tight and feel awkward, which to their way of thinking outweighs the elbow and shoulder pad benefits. And they can't utilize a sling without the jacket (the sling attaches to to the jacket and gun to help the shooter steady the shot) so that's not something they use either. But the girls enjoy their time on the range and as I was chatting with one of the coaches he told me, "Kids have to learn how to just shoot so it doesn't matter if they use the jackets. There aren't any slings and jackets in the woods when they go out hunting." (And this is one of the reasons I like the 4-H shooting sports program, they encourage kids to be safe with a rifle and learn at their own pace. Competition is second to the kids enjoying their target shooting experience.) The girls have absolutely no plans to shoot any real life animals but the fun shoot did mix things up during the last round with some new targets.


These targets were quite a bit smaller than the usual bulls-eyes and according to L, "The little animals were even more tiny through the gun sights!"


Their usual targets are on much larger paper and the bulls-eyes provide a much larger target to take aim. Even though these animal targets presented an advanced shooting challenge for the girls, they gave them a whirl. Neither of them managed to hit any of the animals on their target but they didn't seem to mind.


When we downloaded the pictures at home later G. said, "See mom, I was saving the animals. Yeah, that's it! I missed every one on purpose." That's one way to spin the results of a challenging round of target shooting.

Monday, March 30, 2009

Kid Tracks Column: First aid kit covers all the bases

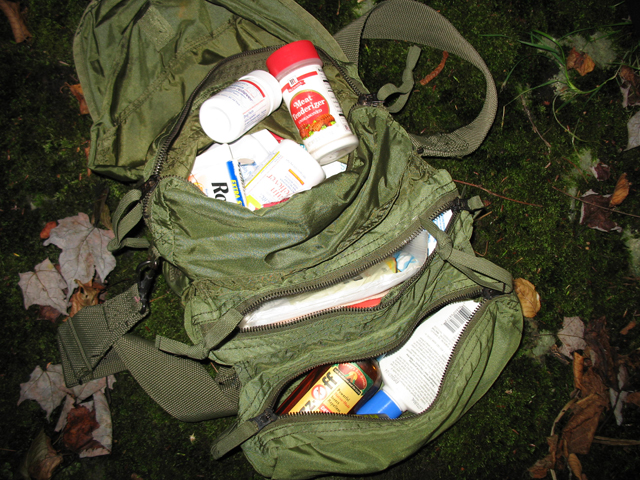
My family's first-aid kit has seen plenty of action over the years. The tweezers have regularly removed ticks and the baby wipes have saved us from poison ivy breakouts. The plastic card has earned a permanent place in our kit since we discovered its leech removal abilities, and we always carry small bottles of meat tenderizer and Benadryl after our run-in with yellow jackets a couple of years ago.

Our first-aid kit includes a couple of items we use all the time – that helps ensure that I use the kit regularly and know when it's time to replenish certain supplies. There is nothing more frustrating than thinking you have an item in your kit, only to discover at the time you really need it that you don't. I also try to make a point to sift through my family's first-aid kit between seasons to check expiration dates as well.

As the weather warms and your family gears up to hit the trails, it's a good time to take a few minutes to organize your first-aid kit. Here's an inventory of the Almeida family's kit (which we consider a constant work-in-progress to adjust to our needs and adventures) to get you started.


* Band-Aids: It was necessary to stock a variety of Disney character and tattoo Band-Aids when the girls were younger because that was the only way we could continue a hike after a minuscule scratch on a finger threatened to prevent us from moving another step. We still stock a variety of sizes and styles because even at 11 and 12, only the perfect Band-Aid will do.

* Hydrogen peroxide: A small bottle of this is a must as my girls refuse (quite vocally) any contact with "that bad nasty stinging alcohol square!"

* First-aid tape: There are 101 uses for tape on the trail beyond the medical need for it. Like when a backpack strap is driving one of the kids crazy and tape can stop the whining (not to tape a mouth closed, though I can admit to considering that a time or two, but to secure a stray strap to the pack).

* Anti-itch cream: In the summer it seems someone always has a mosquito bite. And although scratching a bite isn't a big deal, it can become an all-consuming irritant while hiking or biking (especially if the bite is hard to reach while wearing a backpack). A quick dab of anti-itch cream can cool down a bite and minimize the scratching.

* Baby wipes: This is another multi-purpose item that has been helpful after the misguided steps we've taken into poison ivy patches. By wiping our skin to remove the resins, we've been able to avoid the big rash outbreaks. Although soap and water really is best, the key is to get the resins off as quickly as possible so the wipes do the job in a pinch.


* Meat tenderizer: Making a paste of water and tenderizer helps reduce the swelling of bee stings. This was a tip we learned from a pharmacist and everyone in my family can attest to the fact that this odd-sounding remedy really does work after our run-in with yellow jackets a few years back (you can read about that unlucky break here). We were all stung multiple times and although it was strange to rub meat tenderizer over the stings on my breasts (I was carrying my younger daughter when the yellow jackets took advantage of my short-sleeves to fly in to my shirt and sting me over and over), the paste did cool down the stings.

* Gum: This always helps calm my girls down when they get anxious. And when bigger incidents happen (like the yellow jacket swarming), the chewing action keeps their mouths busy and cuts down on the amount of screaming while I am dealing with the situation.

* Tweezers: We use these primarily for tick removal but we've also found ourselves with splinters from branches on occasion so these are very handy to have.

* Eyewash solution: One time I walked into a branch and scraped my eye (I'd like to blame this on being tall but it really was related to my inattentiveness in watching where I was going). We used regular water from my water bottle to rinse my eye and it was darn cold (and not particularly effective in soothing the gritty feeling in my eye). Then my older daughter had a run-in with a rabbit at a friend's house and the cute little bunny used her face (mostly her eye) as a launching pad out of her arms. We rinsed her eyeball with eyewash solution and I realized how much more soothing it was. Now we carry a small bottle in our kit, which is primarily for me because I'm prone to walk into tree branches with more frequency than I care to admit.

* Moleskin: This stuff works a thousand times better than Band-Aids for blisters on your feet so it gets lots of use on our longer hikes (we pack a small pair of scissors as well to cut it).

* Ibuprofen and acetaminophen: We have a small bottle of each in both adult and children doses. On a particularly challenging hike when my muscles are sore, I will often take some ibuprofen and offer some to the kids right after a hike. This minimizes the complaining about aching muscles later that night.

* Plastic card: I discovered the benefit of an expired plastic credit card while trying to remove leeches off of my daughter's body last summer. The firm, but flexible, scraping of an old plastic card does the job well and I've found it's pretty good with newly attached ticks as well.

* Eyeglass mini screwdriver: If you have a child with glasses then you know that if they're going to have a problem with their glasses, it's going to be somewhere really inconvenient. This little item came in handy fixing our flashlight once on the trail too.

* Baby powder: This is great for sweating feet, chaffed thighs and for sand removal between toes. We go through a lot of powder every summer because dipping feet in whatever stream, river, lake we happen upon is a must to the girls' way of thinking.

* Sunblock and insect repellent: I keep these items in the first-aid kit because I use them frequently and this ensures I'm familiar with my kit's inventory.

THERE's MORE
Other items we also carry include:
* antibiotic cream
* alcohol swabs
* iodine
* Benadryl
* ace bandage
* feminine hygiene pads
* athlete's foot cream
* nail clippers
* emergency heater blanket
* whistle
* small sewing kit
* waterproof matches
* safety pins and paper clip
* hair elastics
* hand sanitizer
* flashlight

I'd like to say our kit is light and easy to carry in a backpack, but it's not. The girls have a smaller first aid kit for our shorter adventures when we're not far from our car (and our larger kit). But I think it's important to be prepared for an emergency (the real ones as well as the ones contrived by the little people in your life) when you're spending time outdoors.

I believe in the theory that if you're prepared for anything, you won't actually need any of it. That's worked well for us over the years. Oh, and trust me that the gum and preferred Band-Aid requests should be accommodated. That's a small price to pay for some solid insurance for a fun family adventure, too.

Originally published in Raising Maine Magazine, April 2009

Friday, March 27, 2009

Spring trip to ocean at Wells Reserve

Wednesday afternoon was a perfect 50 degree spring day in Maine and we dropped everything else in our schedule to enjoy it at Wells Reserve.

Our Flat Stanley, who is soon to be off on a new adventure (with the fairy girls), came along for the fun too.


We brought along some bubbles and the wind was just right to do all the work of sending the bubbles flying around the beach.


L. was being her spunky self by trying to aim the bubbles for my face (and camera) because she thought it was "hilarious!" There was much belly laughing about the bubbles and confirmed that it is still a much enjoyed activity for middle schoolers.


I think the video below sums up the different approach each of my girls takes to life. I love and appreciate both of their ways because they offer a balance and positive influence on each other. And I am grateful that G. has found ways to manage her feelings about the ocean beach (her toddler and preschool years are the reason I became well-versed in Sensory Integration issues and if you're facing the same issues you can see from this video how it translates to the middle school years).


L. wanted a partner to wade in to the waves with her so I joined her for a little bit (I also needed to make sure she didn't dive in to the fast moving current because I would not have put it past her). Well, I waded as much as my toes could handle before they turned various shades of red and blue.


L., who lasted in that water a lot longer than me, warmed up her feet and hands afterward with the sand. She even came up with a shoe style in the process - "Chuck" sand shoes.


The only incentive to leave the beach (even after a couple of hours) was the promise of a stop at The Maine Diner. The girls love that place and a trip to Wells Reserve doesn't feel "complete" to the girls without a pit stop for some chowder.

Thursday, March 26, 2009

Chocolate fudge recipe with tasty results

G. has been cooking up a storm the last few months. She was stuck on desserts (cakes, brownies and other sweets galore) before I encouraged her to do a bit more cooking and a little less baking.

I have no willpower when warm cake with dripping homemade frosting is on the counter. Or those chewy brownies with M&Ms she makes that offer the perfect chocolate fix. Oh and then there are the melt-in-your mouth muffins for breakfast (lunch and dinner).

It has all been too much for me to resist so I had to move her on to something else.

Now she's developing a repertoire of pasta dishes, oven omelets and pot roast in the slow cooker. I'm thankful for her interest in feeding the family more nutritiously (and I am very appreciative since she is saving me tons of time by preparing dinner!)

But G. picked up a fudge recipe from a 4-H workshop (part of that Mini-Forum 4-H conference that has provided so much after-event entertainment for L. lately with duct tape and fairy flowers) that is really tasty.


G. made fudge this morning and she suggested I share the recipe with the moms on Raising Maine (which was likely also a suggestion that she get some time in the spotlight on Kid Tracks like her sister has lately).

So to honor that request, here is the Chocolate Fudge recipe that is super easy and has good results (G. is 12 and makes this on her own without any adult supervision).

CHOCOLATE FUDGE
Melt in saucepan:

6 Tablespoons butter
4 Tablespoons milk

Add to melted mixture all at once:
1 teaspoon vanilla
1/2 cup powdered cocoa
1, 1 pound box/bag confectioners sugar

Stir until well blended.
Spread in buttered 8x8 pan. Let cool. Cut in to squares.

 
Recipe provided by Cumberland County's Extension Office, 4-H Mini-Forum's Fudge Making workshop

Wednesday, March 25, 2009

Learn about map confluences with GPS unit

When I bought my GPS unit several years ago the girls and I read the manual (well, most of it) to learn how to use it because we all wanted to find hidden treasure (geocaching and later to find Earth Caches and create GPS drawings). These fun games offered plenty of incentive to get things figured out.

But what was missing in my girls' education about the GPS unit was what the coordinates it displayed on its screen actually meant when they were translated to a printed map. A while back I made a map matching game and played it with a group of 4-Hers. We all had a lot of fun and learned quite a bit in the process (see below to take our Test Your Map Knowledge Quiz).

Part of the matching game included the term "confluence." That’s an exact spot where an integer degree of latitude and an integer degree of longitude meet, such as 43°00'00"N 71°00'00"W. Put another way, imaginary lines of latitude and longitude intersect each other, forming a grid that covers the Earth and helps us locate points on it. These imaginary lines are called confluences.

It’s a big (and key) mapping concept so I did of bit of research and found the Confluence Project website to help me explain this in terms of real life application to the kids.


This site posts trip reports of people documenting, through photos and their GPS units, confluences all over the world (and not all are on land - there’s water and ice cap confluences too). It’s a cool site (well maybe you sort of have to be a tech geek like me to appreciate it) and helped the girls understand what a confluence actually was and how we use these coordinates to pinpoint locations on a map (the Maine Gazetteer is also helpful since it displays confluences - and if you look really close at the 4-point or less type, you'll see coordinates on those lines as well).

After sifting through the confluences in Maine and New Hampshire on confluence.org (there are 64,442 possible confluences on the globe this site recognizes as do-able trip reports) we chose one that wasn‘t too far away and appeared easy to find. Well, it looked easy enough since it appeared to be off Route 302 just over the Maine border in Conway, NH.

It turned out that the 44° N 71° W confluence was in a swampy area in back of a private home. We did our best to get as close to the confluence as we could but we were .006 seconds off with our final reading.

But we learned (or in some cases, re-learned) some things:
    * Important map references can be in the most ordinary of places, like your own backyard.

    * GPS units have a margin of error of 8-10 feet in most cases (newer models might be a little more accurate because the technology has improved tremendously in the past few years. My first GPS unit, about 5 years old now, had a margin of error of 30 feet.)

    * The earth is always in motion so if you stop for more than a couple of seconds, your GPS unit coordinates will jump around. You may have been exactly where you were supposed to be but getting the GPS evidence of that can be tricky.

    * Tree cover affects GPS units and how efficiently they can connect to satellites, which can affect your margin of error.

    * Just because your GPS unit points you in a particular direction does not mean you throw common sense out the window and follow it (i.e., we weren’t going to trespass and/or walk through the mucky swamp any more than we had to - we learned this lesson a few years ago in Brunswick).

    * Sometimes the effort of finding a place is more about the journey than the actual location. In the case of recording this confluence, Fino stepped through the snow and into the swamp. He was covered in mud up to both knees and that will be what is remembered by our family on this short adventure rather than finding the confluence.


Test Your Map Knowledge Quiz

1. The line of 0° longitude is called this.

2. Longitude lines give directions ____ and ____of the prime meridian.

3. The line of 0° latitude is called this.

4. Latitude lines give directions ____ and ____ of the equator.

5. There is another name for latitude lines. What is it?

6. What do we call the imaginary lines of latitude and longitude that intersect, forming a grid that covers the Earth and helps us locate points on it?

7. True or False: The Earth is a perfect sphere.

8. True or False: Each degree of latitude is divided into 60 min. and each min. into 60 seconds.

9. When you mark a point of latitude and longitude, what is that called?

10. Degrees of latitude and longitude are divided into 60 minutes. What is the symbol used to identify this?
(a) " (b) '

11. Degrees of latitude and longitude are divided into 60 min. and then those min. are divided into 60 seconds. What is the symbol used to describe seconds?
(a) " (b) '

12. If you set up your GPS unit to record and report decimal longitude and latitude, you would see which coordinates.
(a) N 43.917611, W -70.317695 (b) N 43° 55' 3.3996" W -70° 19' 3.702"

13. If you set up your GPS unit to record degrees, minutes & seconds longitude & latitude, you would see these coordinates.
(a) N 43.917611, W -70.317695 (b) N 43° 55' 3.3996" W -70° 19' 3.702"

(Questions 10-13 are important to understand when you own a GPS unit because these are setting options. And let me confirm that unless you are a geometry math whiz do not try to convert degrees, minutes and seconds to decimal degrees without a calculator. It’s not an easy computation. Geocachers use the degrees, minutes and seconds setting but Google maps defaults (at least in my experience) to decimal degrees so it‘s important when using a GPS unit to recognize that not all coordinate markings are listed in the same way. These two different coordinate settings in no way translates to the same location without the complicated geometry computation.)

ANSWERS to quiz are below photos


The swampy area was more easily managed at this time of year than it would have been if we ventured here in the summer. But Fino took a bad step and ended up to his knees in mud.


 So close yet not quite for the true confluence.


Our closest reading caught on the camera of the confluence. Off by .006 isn't too shabby.


QUIZ ANSWERS: 1. Prime Meridian, 2. East and West, 3. Equator, 4. North and South, 5. Parallels, 6. Confluences, 7. False, 8. True, 9. A coordinate, 10. B, 11. A, 12. A, 13. B

Tuesday, March 24, 2009

Creative inspiration: Duct tape hats

L. has been making headgear out of duct tape and having a ball with it (she was inspired to do this after taking a 4-H workshop). The only downside to this craft project for L. has been ripping the tape. She was sporting several band-aids over small blisters on her fingers from all her ripping action last week. But after seeing her many creations, it's no wonder her fingers have been sore. She designed a wide variety of hat styles for everyone in the family.


The top hat below is complete per L.'s standards with its special bow on the brim (although I was told it would look better with a pink or purple bow if she had that color of tape - I indulged the request recently with a couple of colored rolls from the craft store).


She made this one at her 4-H workshop, which had the purple colored tape available.


But this is my very favorite creation simply because it never would have occurred to me to make a sun visor for Dulce, the family cat.

 
L. posted a blog entry about making this hat and the highlight of her explanation was:
    I decided to make my cat Dulce a duct tape visor with a chin strap so it would not fall off her head.
Yup, she spent some time working out this design to ensure it would not only fit on her cat's head but that the cat couldn't shake it off (and she's made several hats for her cat so Dulce is tolerant of modeling them). She also made her sister a visor - with flowers - to match.


Duct tape is not particularly cheap when you buy a bunch of different colors but she made all these hats with one regular roll of tape so it does last quite a while (she used recycled cardboard and/or piece of poster board as the base for some of these hats). But I think the entertainment value was worth the $3.50 I paid for that first roll of tape. Anyone else ever make projects with duct tape? L. got a few ideas from the Duct Tape Club but she was wondering what other kids like to make with the stuff.

Monday, March 23, 2009

Around the sugar house - Maine Maple Sunday

We made a quick stop to Merrifield's Farm sugar house yesterday to pick up some maple sugar treats. We ran in to a large crowd and the owner of the farm said that about 1,800 people pass through his sugar house on Maple Sugar Sunday each year.

We usually go earlier in the day to avoid the huge crowds but we braved the insanity because we REALLY wanted our maple sugar fudge and cotton candy. We've visited other farms in past years but nothing says Maple Sugar Sunday like the fudge and cotton candy (and of course syrup, but that's a second in the kid's book) and Merrifield's always has it all (as well as maple cookies, maple sugar candy shaped like a leaf, hard candy, etc., etc.).


The girls dug right in to the 6 pieces of fudge and it was a struggle not to eat the last piece we picked up for grandpa.

If you missed this spring celebration and are curious about how maple syrup is made (it really is interesting), here's a video from Snell's Farm in Bar Mills we made a while back.


We also caught some clips of the cast iron pot boiling method done in times gone by at Merrifield Farm in 2007 (also an interesting and even more of a time-consuming process than the modern method).


Friday, March 20, 2009

How to make clothespin flower fairies

L. has been inspired this past week to make these fairies and has made several so far. The instructions are easy to follow and the results are really cute.


L. suggested I share the step-by-step directions to make these flower fairies here so other kids can make them. She also did a demonstration on how to make these fairies for me to record and post on YouTube (see below). But here are a few snapshots of the making process (materials list and written directions below).


FLOWER FAIRIES:
MATERIALS

Wood pieces
10, 8 mm round beads
3/4 x 7/8-inch mini wood apple (head) (L. also uses 1/2 wood bead w/hole as well)
1/2 x 1/2-inch spool with center hold
1 x 13/16-inch small candle cup

Other pieces
silk flower
white pipe cleaner
black permanent marker
Spanish moss or raffia
powder blush
scissors
hot glue gun

INSTRUCTIONS:
1. Separate silk flower from stem and separate the parts.

2. Turn candle cup upside down. Cut a 3-inch piece of pipe cleaner and insert through the hold of candle cup, glue one end in cup. Place larger petals over pipe cleaner that sticks out and glue. Glue small spool in place over the pipe cleaner. Trim stem even with top of spool.

3. Glue candle cup over a dowel or doll pin and stand.

4. Wrap the center of the remaining pipe cleaner around the spool, twisting the ends in the back to secure. Thread five beads on each end for arms. Spot glue the last bead to secure. Trim even with last bead or leave 1/2 inch for a "hand" to wrap around flower stem.

5. Glue small petals or leaves over spool for bodice. Spot glue at front and back. Glue leaves or petals to the back of spool for fairy wings.

6. For the head, hold the wood apple upside down with the widest part at the bottom. Apply powder blush (with cotton swab) to the cheeks. Use the black marker to dot the eye. Glue head to the top of the spool.

7. Glue moss/raffia to the head for hair.

These instructions - and most of L.'s supplies - were provided by 4-H mom Jen Grant during the 4-H Mini-Forum at USM last weekend. Thanks Jen!

Tuesday, March 17, 2009

Birding, with a sprinkle of spring

We spotted a white-breasted nuthatch during our visit at Gilsland Farm Audubon Center on Sunday and G. determined with the zoom lens of the camera that it was a male bird (the males have black on the top of their head, females have a grayer color). L. confirmed this sighting with her reference book and binoculars as well. The girls have this tag team thing going with the Bird Identiflyer, Peterson's Guide, binoculars and family camera. They take turns with the various birding "equipment" and it keeps us all entertained.


The girls had been begging to go back to Gilsland Farm since our trip last month. I am aware it is kind of silly that we drive all the way to the Audubon Center to watch their bird feeder. Our own at home sees plenty of action but the girls think there are more interesting birds in Falmouth. Oh, and did I mention they like browsing in the gift shop there too? During this trip, G. and I asked some questions about the store's binoculars (the prices range from under a hundred dollars to several thousand). We learned quite a bit about the power of magnification numbers and size of the lens from the very helpful and friendly clerk at the store.


G. was offered a chance to try out a couple of binoculars to understand the differences among them. When the $1,900 pair was offered to her to try, I immediately said no. G. is 12 years old and I'm still afraid she's not going to be careful with an expensive item (even though she's proven time and again the past couple of years she is not the destructive preschooler she used to be). The clerk assured me it was OK and G. rolled her eyes in my direction before testing out the expensive pair. And even though G. liked the pricier option, she thought the $300 pair would work just as well.


We did not spend all our time in the gift shop or sitting at the picnic tables watching the bird feeder however. We did actually do a bit of hiking around the farm. It was sunny and warm (relatively speaking for March in Maine of course) and we saw plenty of signs that spring is coming. The Audubon Center has some bee hives and they were active with little guys flying around and Fino managed to encourage one to land on his finger.


The clear periwinkle blue sky is wonderful this time of year.


Seeing any sort of plant life is encouraging too (even if it is around in winter).


The girls were not convinced it was boating weather yet but were impressed these kayakers were out paddling.


We saw a fast-moving spider in a snow-free patch of marsh but G. wasn't fast enough with the camera to catch him. But there is still snow around so spring isn't here quite yet. The girls had a little fun kicking it around to relish the last few days of this favorite seasonal activity.


The best sighting was a couple of smiling faces soaking up the rays.


My crew loves cross country skiing but we are looking forward to the warmer days of spring ... and ditching our winter jackets!

Monday, March 16, 2009

GLOBE at Night Campaign starts tonight

This is a fun and easy way for families to participate in a world-wide activity that records observations of the night sky and assess light pollution around the globe. My family participated  <a href=http://raisingmaine.mainetoday.com/blogentry.html?id=453>last year</a> in the GLOBE at Night Campaign and we all found it educational and quick and easy to report our observations. The kids were fascinated with the previous year's observation results and had had a better appreciation for how many more stars we see in our little neck of the woods than most people around the globe do.

The <a href="http://www.globe.gov/GaN" target=new>2009 GLOBE at Night campaign starts tonight</a> (March 16) and runs through March 28 this year if you're interested in participating. BelowThis is a fun and easy way for families to participate in a world-wide activity that records observations of the night sky and assess light pollution around the globe. My family participated last year in the GLOBE at Night Campaign and we all found it educational and quick and easy to report our observations. The kids were fascinated with the previous year's observation results and had had a better appreciation for how many more stars we see in our little neck of the woods than most people around the globe do.

The 2009 GLOBE at Night campaign starts tonight (March 16) and runs through March 28 this year if you're interested in participating. Below is an explanation from the website about how it works.

**********************************************

GLOBE at Night provides an opportunity for students and families to take part in a 2 week world wide citizen science project and contribute data to record night time light pollution across the world. One needs to merely go outside, look up, observe the stars from your location, and record your star observations at www.globe.gov/GaN

You'll find instructions on how to find your longitude and latitude without a GPS (you may also use a GPS if you have one), there is information about observing stars and light pollution in your nighttime sky.

The GLOBE at Night program directs students, families, and the general public how to observe and record the number of stars visible in the constellation Orion, as seen from different locations. Observers report their results online by comparing their view of Orion with a set of template images on the program’s Web site, which shows the number of stars in the constellation for a range of visibilities from bright skies to very dark.

2008 marked a monumental shift in human history when the number of people living in cities exceeded half the people on Earth. Because of the ambient light of urban landscapes, many city dwellers have never seen a sky full of stars. The 2008 campaign received measurements from 62 countries. Just over 4,800 of the measurements came from the United States, followed by 380 measurements from Hungary; and Romania, the Czech Republic, Costa Rica, and Spain each reporting over 100 observations.

2009 GLOBE at Night campaign set for 16 - 28 March, 2009.

Five Easy Star-Hunting Steps:
1) Find your latitude and longitude.
2) Find Orion by going outside an hour after sunset (about 7-10 p.m. local time).
3) Match your nighttime sky to one of our magnitude charts.
4) Report your observation.
5) Compare your observation to thousands around the world.

Wildlife education, good for kids and adults

The kids participated in a day of workshops (before the Fashion Revue finale) that included Sparks Ark Animal Emergency Services, a wildlife rehabilitation center that does a lot of outreach programs to teach kids about Maine wildlife.

G. sat up front with her camera and took some pictures and video of the program for her own blog. But after reading Mama Bird's post about owls, I thought I'd share G.'s video here because Josh featured a great horned and a saw-whet owl at the program and offered some interesting anecdotes about them.


Not only do the kids enjoy the animals and learn a lot at these kind of programs, the parents get some good advice about working with wildlife as well. One of the key points Josh made at this program was that just because baby animals look cute and helpless doesn't mean you should try to "save" them.

We had well-meaning neighbors drop off a couple of baby raccoons they found near the side of the road (near our house) last year. Our neighbors coaxed the babies in to a cardboard box and brought them to my front door believing my husband (who works at a vet hospital) would know what to do with them.

We did know what to do. We put them right back where they were found that evening.

The next morning the babies were gone, in all likelihood with their mother who had probably been nearby the whole time and had stayed hidden while the good meaning neighbors gathered up her babies to take them away.

Here's Josh's bit of advice about this issue.
    Something you want to keep in mind in case you see any baby wild animals. Leave them where they are. The best thing is to leave them where they are and wait. If you go back the next morning or later that night and they're still there, then call somebody like us (Animal Emergency Services). And we can usually tell from looking out there if there is something wrong with them, if they're sick or if it looks like they're hungry and their parents haven't come. A lot of wild animals though won't come near their babies. The parents are scared of us, the babies aren't. The babies have never met people, they aren't scared of people. The parents are scared of people. As long as we stay around, the parents don't want to come back."
A good reminder with spring right around the corner and the little critters are out and about with more frequency in the warmer weather.

Sparks Ark offers a program each month at the Children's Museum of Maine (the March date just passed) so your kids can meet these animals too. There is also a program being offered at the Maine Wildlife Park in May to offer tips, tricks and ways to discourage wildlife that may be causing trouble in your home or garden.

G. wanted to share some of the photos she took of the animals as well.

saw-whet owl

possum


baby goats a few weeks old

chinchilla


Mini Forum is a day of workshops for 4-Hers held at USM in Gorham each year.

Saturday, March 14, 2009

Sewing projects shown off at Fashion Revue

The 4-Hers got a chance to strut their stuff and show off their sewing skills on the 4-H Fashion Revue runway today at USM.

Both girls and boys modeled their handmade items in front of a large audience (Fashion Revue is part of an all day, conference-type program of workshops for 4-Hers in Cumberland County).

The sewing projects were an eclectic mix (as always) that included a pillow case, Webelos vest, dog bed, messenger bags, fleece hat with scarf, a coat and a couple of dresses (one dress machine stitched, the other completely hand-sewn).

ALL the kids did some amazing work this year, with an attention to detail that made these projects extra special.

I reminisced about our beginning sewing days recently but my girls' smiling faces on the runway assured me that it was time well spent this winter helping them practice the skills needed to complete their challenging projects. We have more than a couple of swatches of practice button holes and mini zipper pieces in our craft room (formerly known as the playroom when the girls were younger) to attest to the learning curve. And the truth is, L. can make button holes and G. can put in a zipper better than I can now.

And what was I doing while the girls were on the runway enjoying their moment in the spotlight? Tearing up behind the lens of my camera like I do every year.

The less embarrassing thing about that this year was that I noticed I wasn't the only mom with a child on the stage doing that.